contact Me

Use the form on the right to contact Me.


123 Street Avenue, City Town, 99999

(123) 555-6789

email@address.com


You can set your address, phone number, email and site description in the settings tab.
Link to read me page with more information.

Blog

Wrist Strap & Lanyard Video Tutorial

Michelle Burke

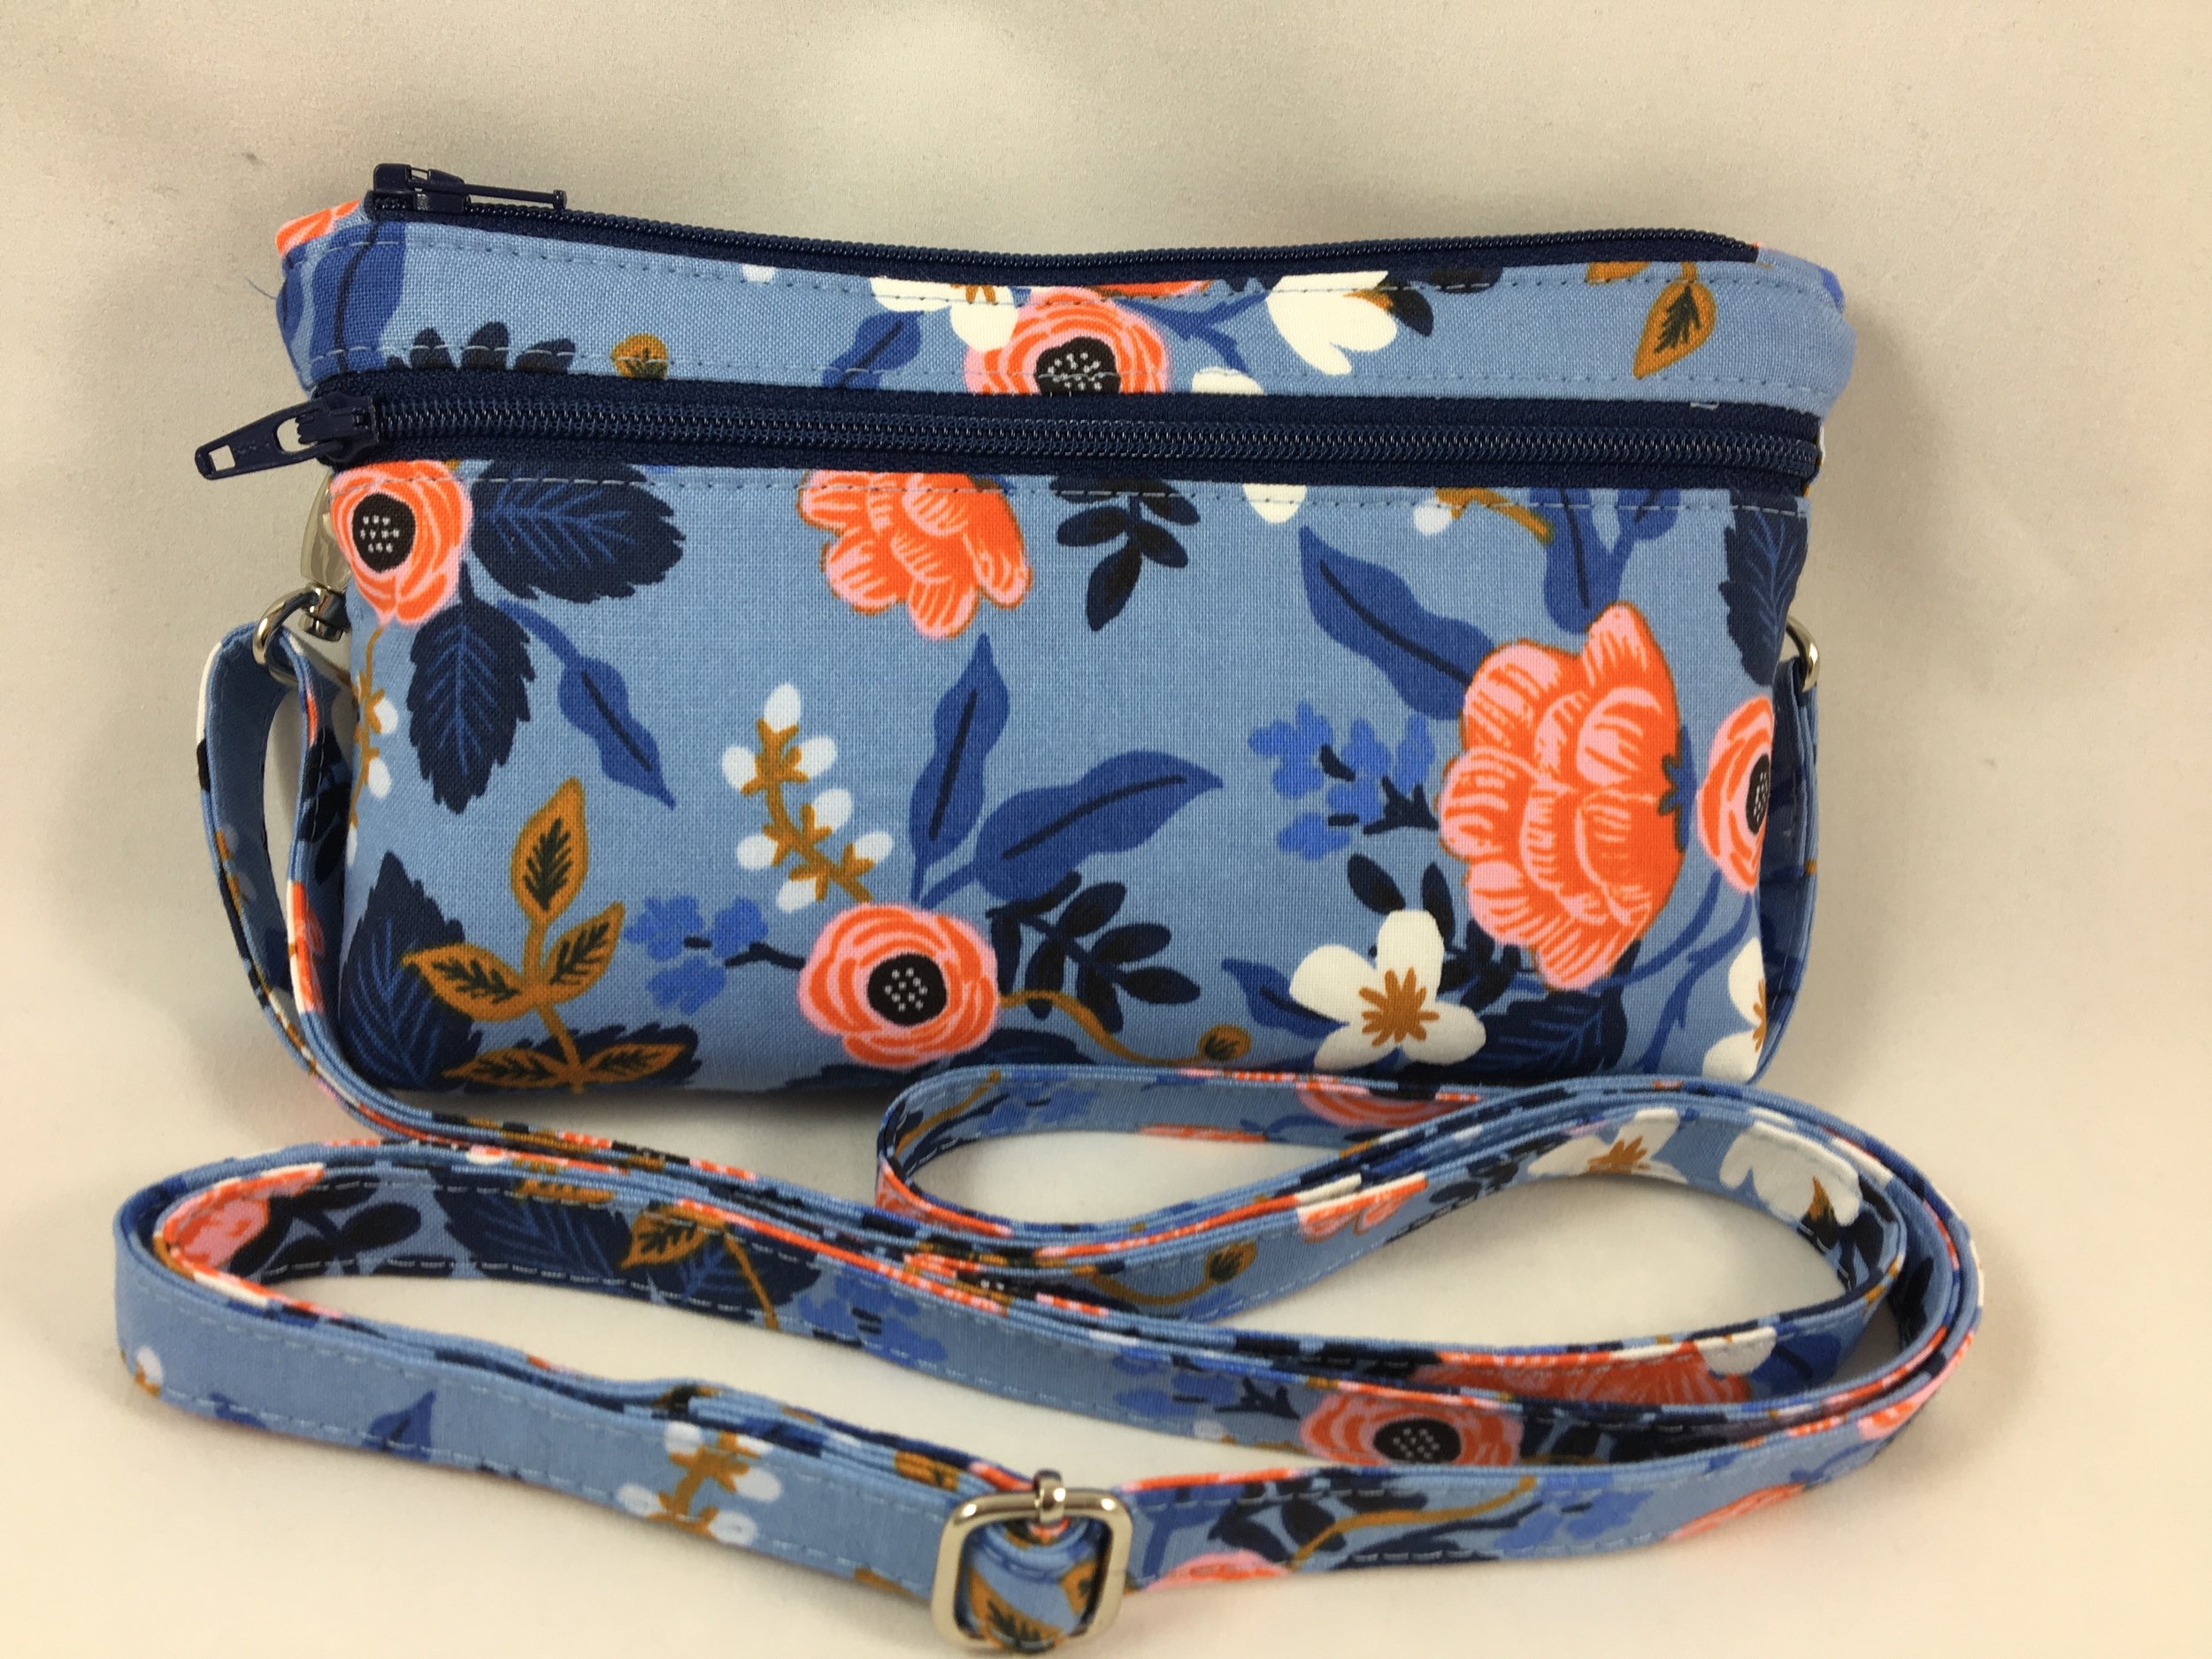
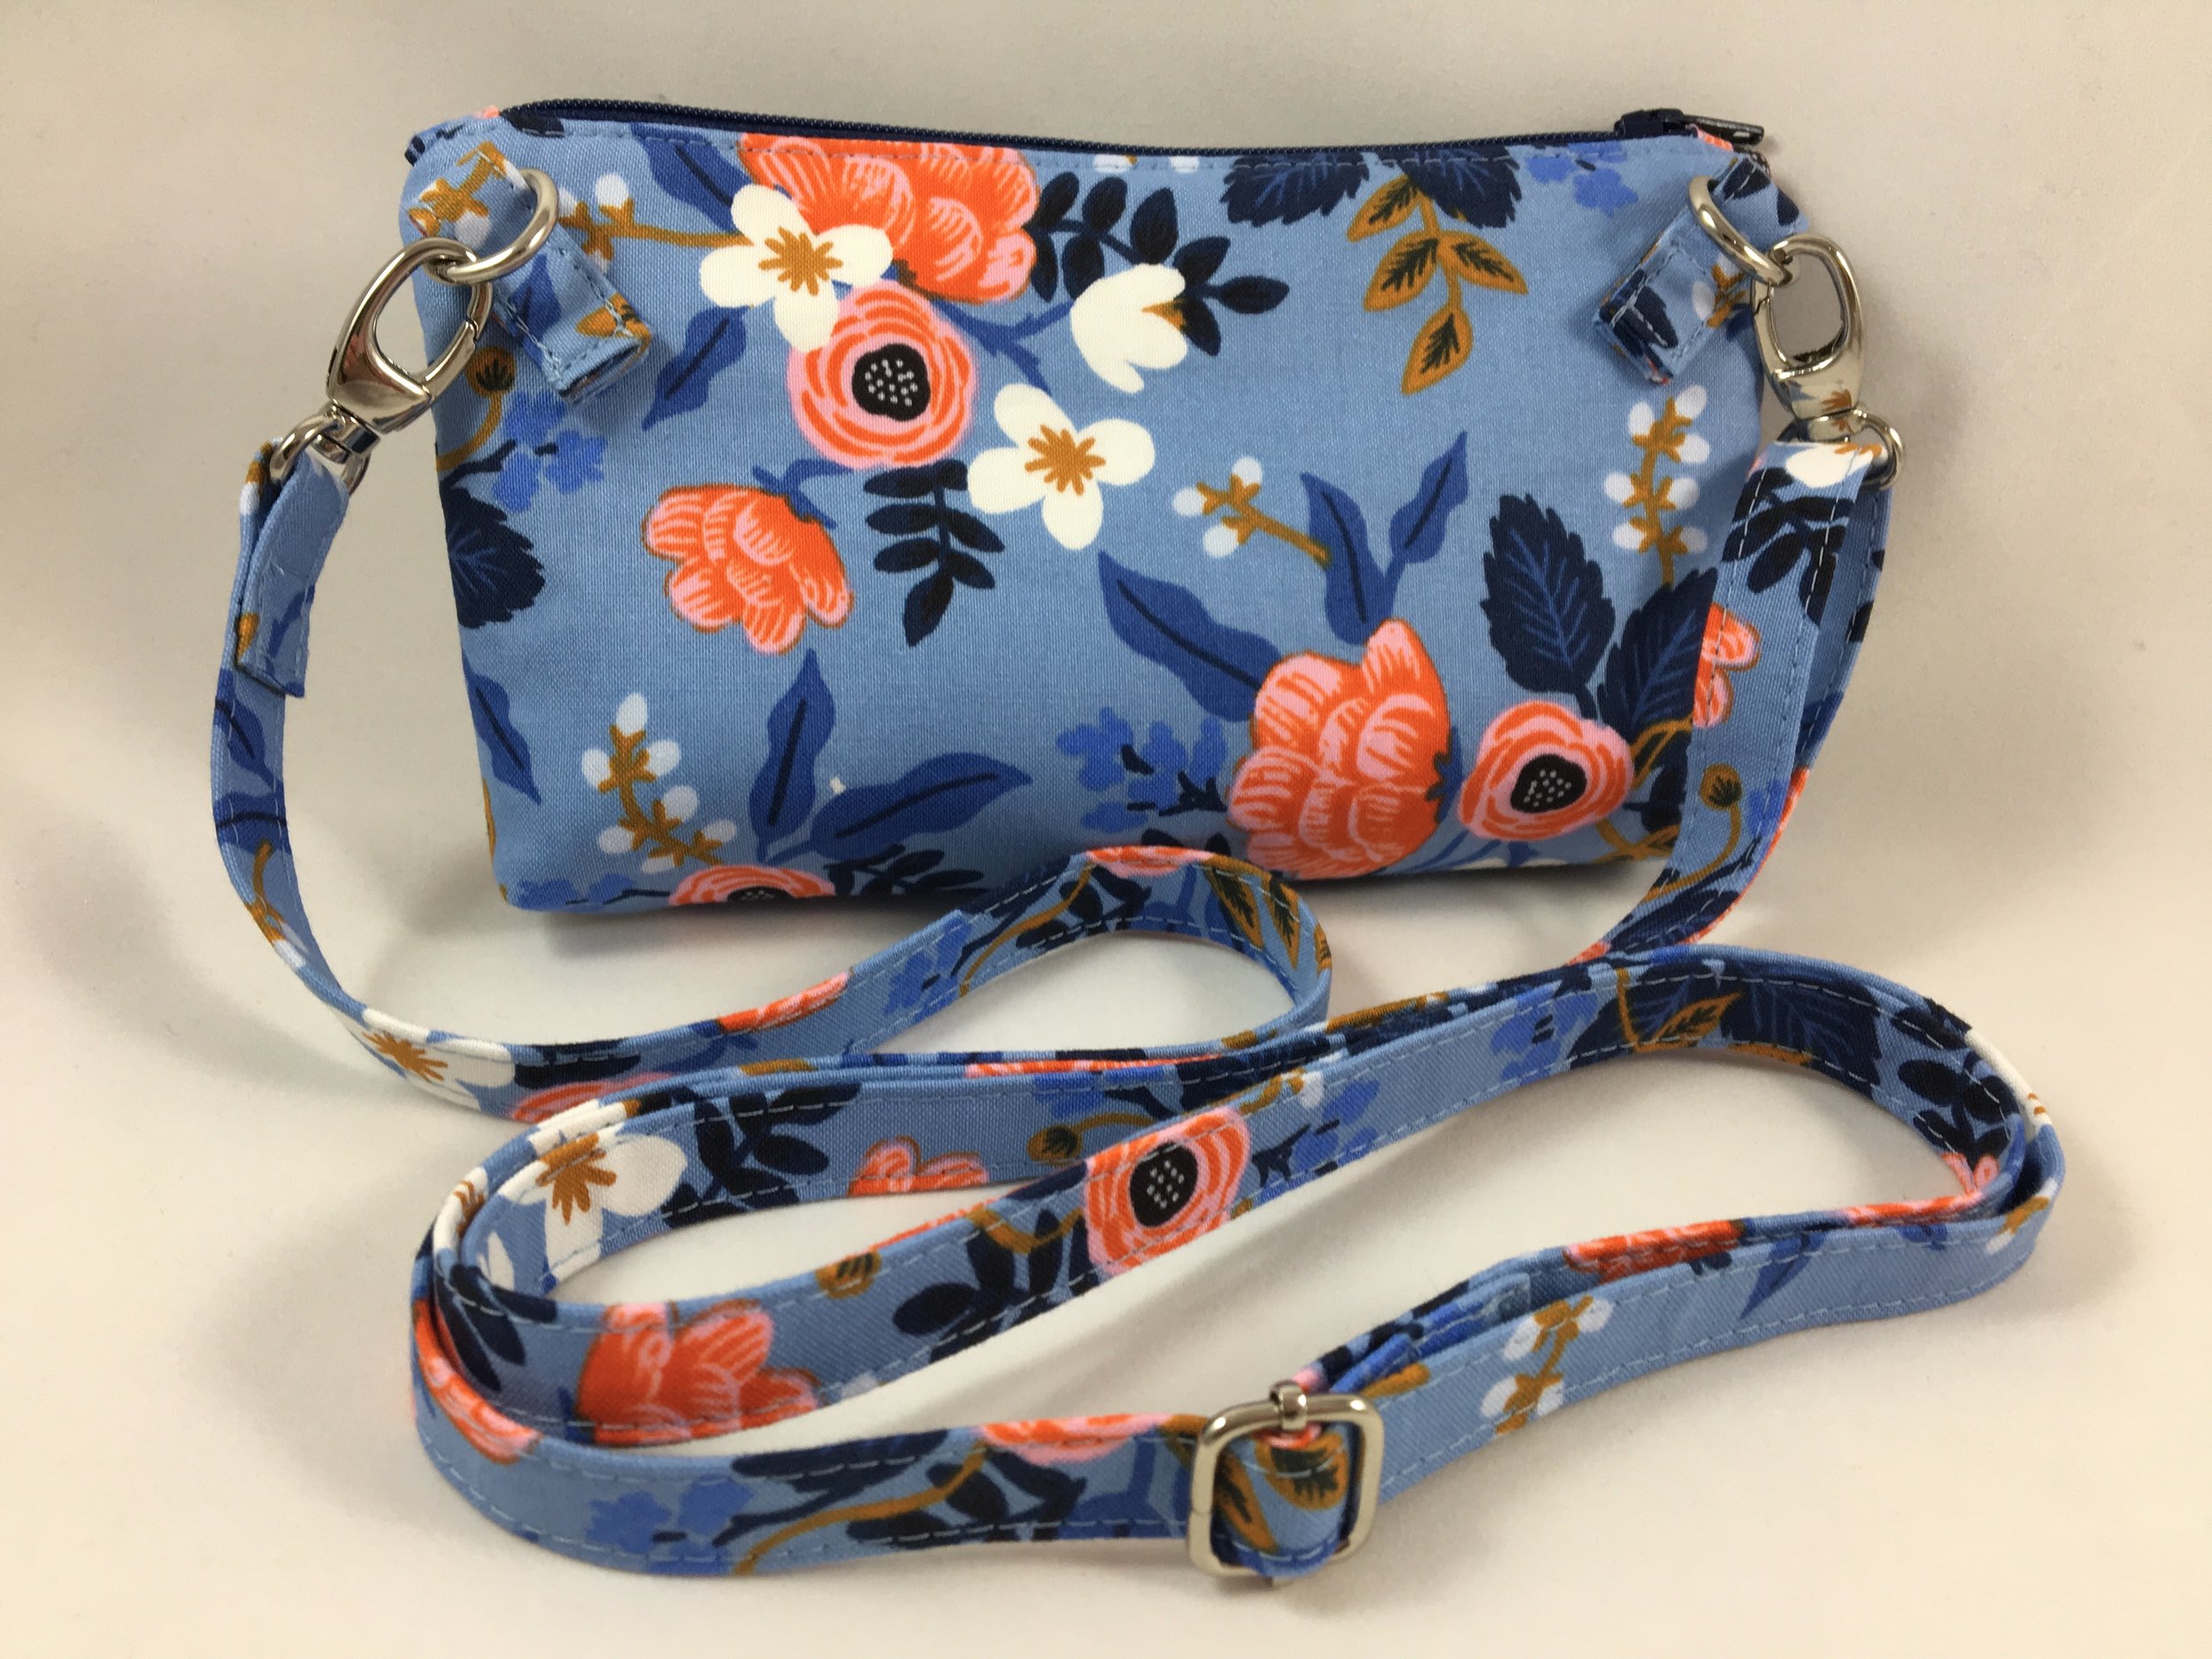
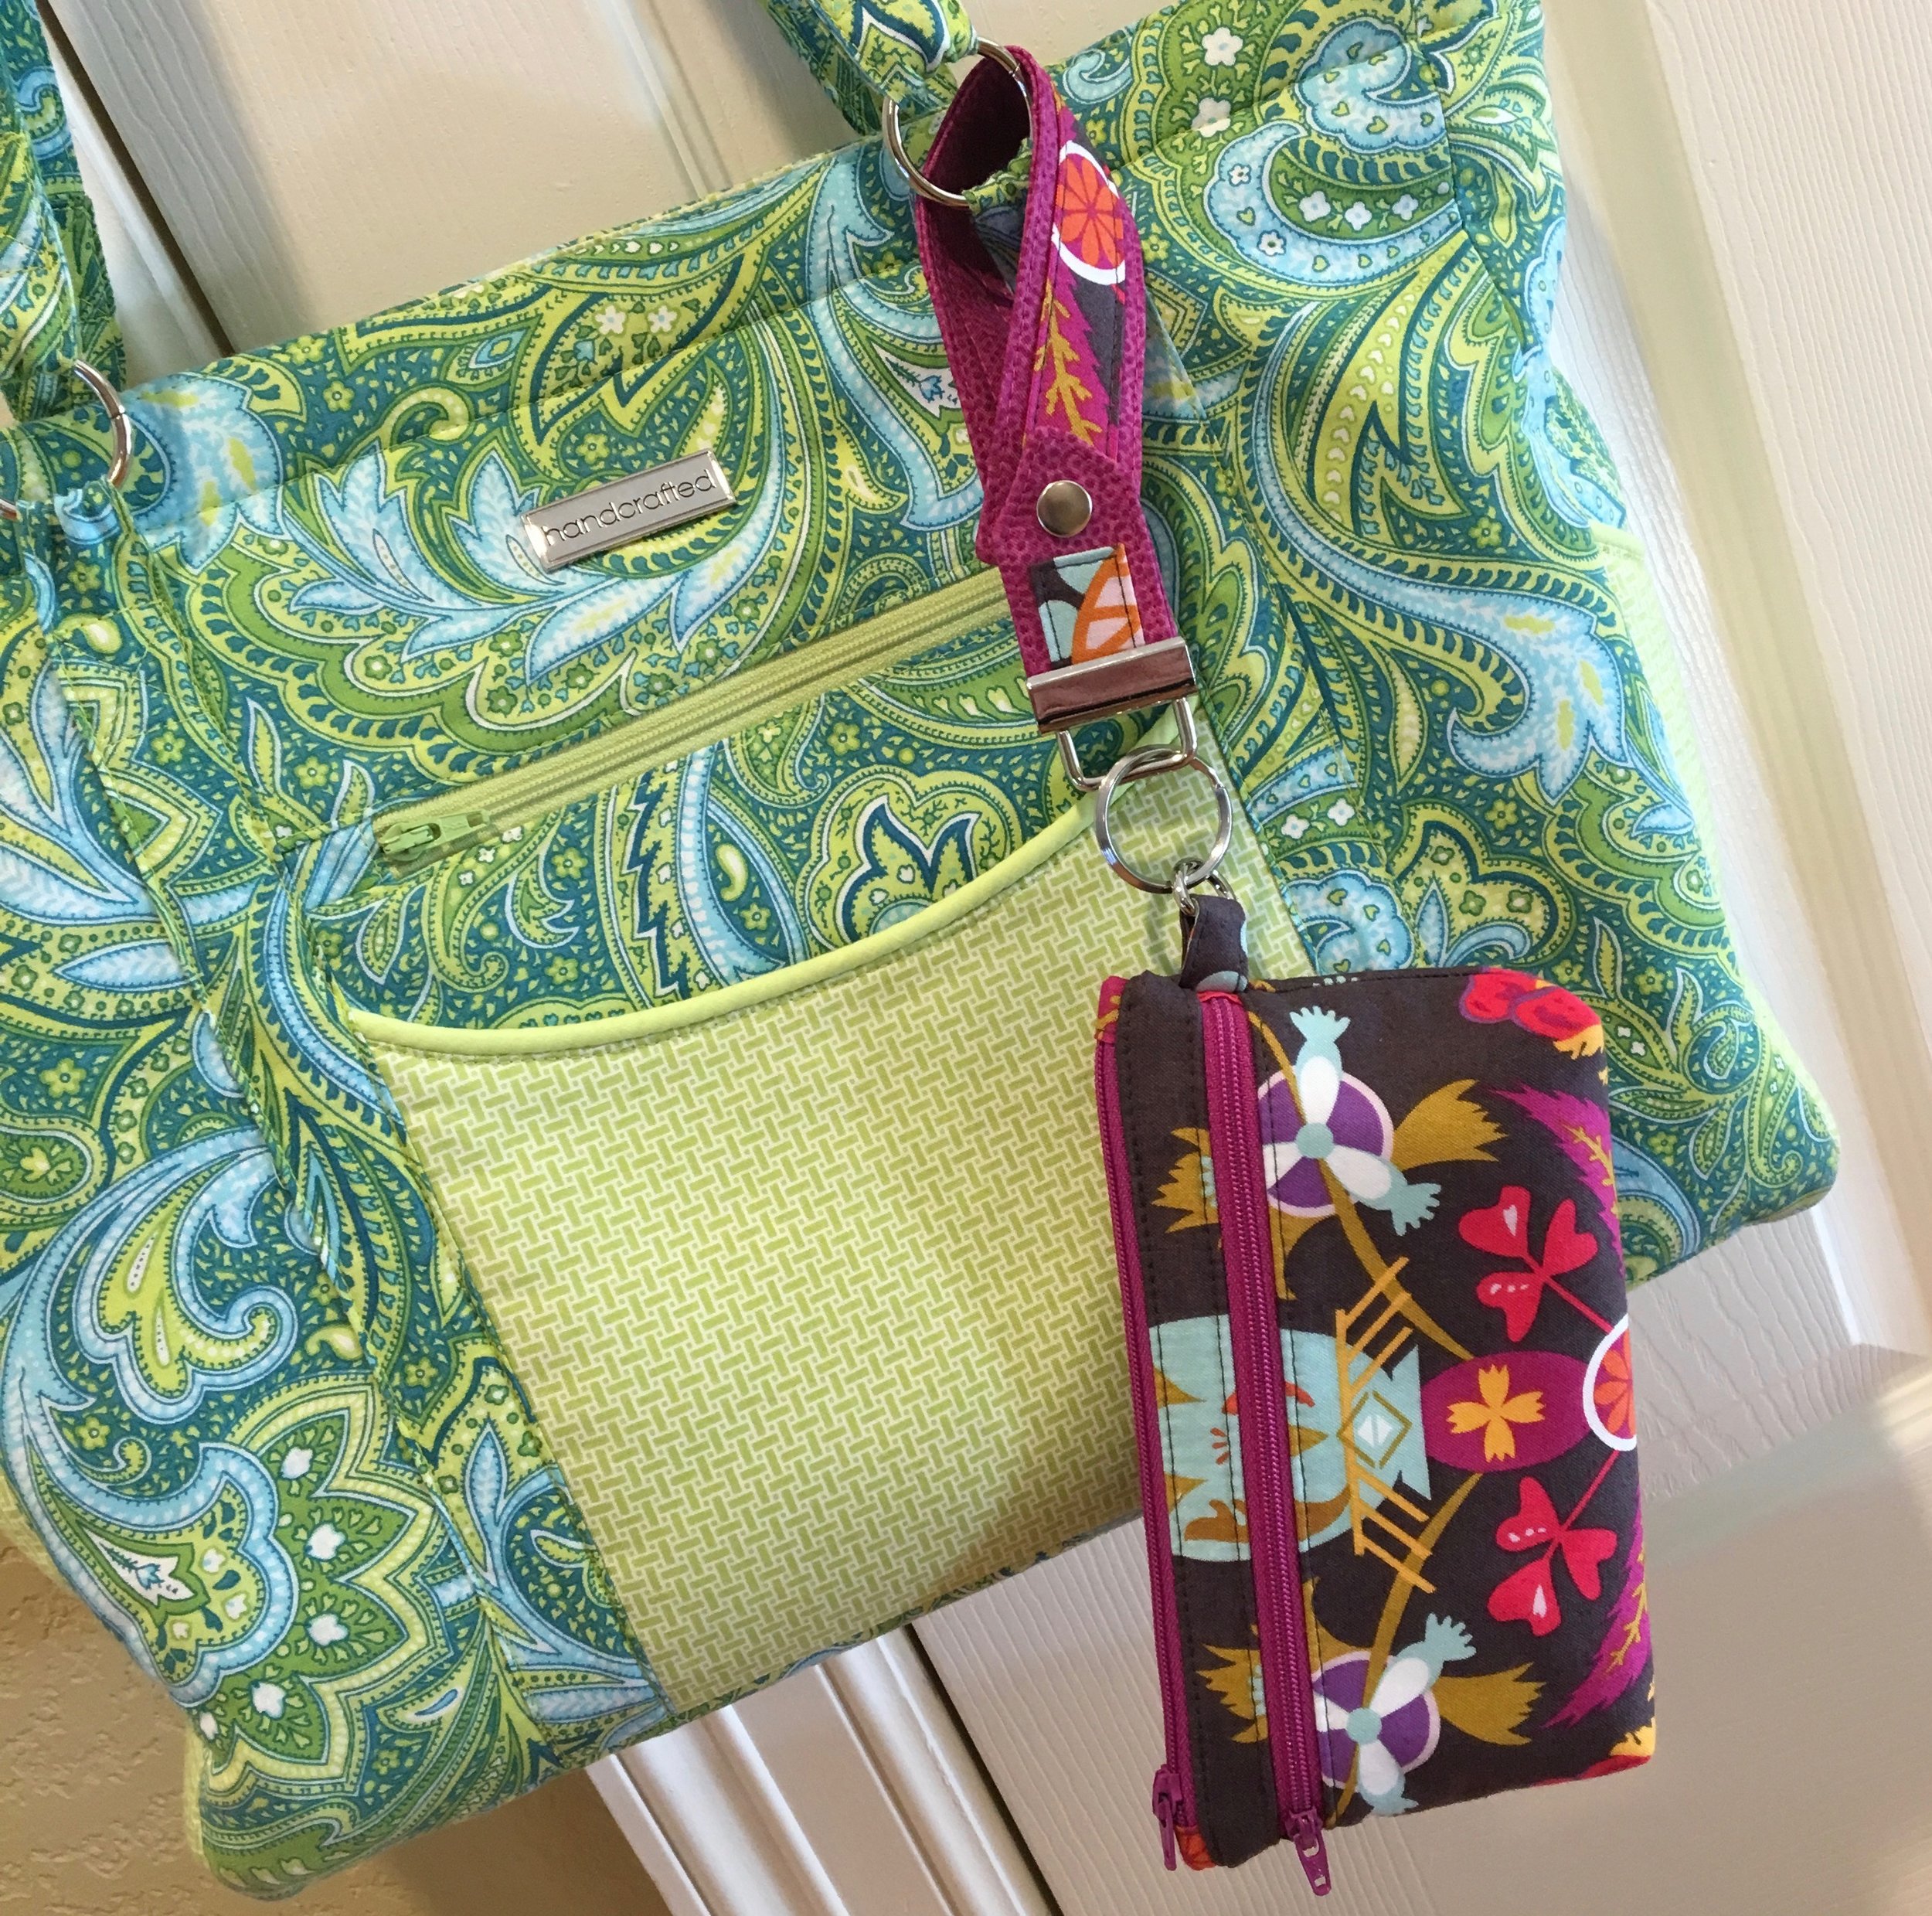
The final video tutorial in the Kristine ID Wallet series is now ready to be viewed on the Uniquely Michelle YouTube channel. In this last video, I show you how to make the wrist strap and the lanyard strap for the Kristine ID Wallet. Really, this video isn’t exclusive to the Kristine ID Wallet, you can make a wrist strap or lanyard using this video tutorial for any wristlet or wallet or just to be used on its own.

3ABAC585-FA83-4C10-96E9-7F6BBAEC9EE9.jpeg

There are five video tutorials showing the making of the Kristine ID Wallet available on the Uniquely Michelle YouTube channel. The five videos include one for making the flap side of the Kristine ID Wallet, one showing how to make the alternate version of the ID window pocket, one showing how to make the original ID window pocket, one showing how to put the Kristine ID Wallet together, and the final video showing how to make the wrist strap and lanyard strap.

3DD5C1BD-2020-4B64-A931-FDF0561799A8.jpg

Make sure you subscribe to the Uniquely Michelle YouTube channel so you know when new videos are posted on the Uniquely Michelle channel. You can also sign up below to receive the Uniquely Michelle newsletter - a great way to keep up with the latest happenings at Uniquely Michelle. If you don’t yet have the Kristine ID Wallet pattern, you can purchase it at the Uniquely Michelle Etsy Shop, the Uniquely Michelle Website Shop, or on Bluprint.


Yet Another Kristine ID Wallet Video Tutorial

Michelle Burke

Are you ready for yet another Kristine ID Wallet video tutorial? I hope so! The latest video tutorial now available on the Uniquely Michelle YouTube channel has us putting all the parts of the Kristine ID Wallet together. Essentially, we will finish up the Kristine ID Wallet . . . except for the wrist strap and lanyard. So if you want to see some tricks and tips for adding the zipper and the final steps for completing the Kristine ID Wallet, this video is for you!

IMG_5929.jpeg

In case you are keeping track, there are now four video tutorials showing the making of the Kristine ID Wallet available on the Uniquely Michelle YouTube channel. The four videos include one for making the flap side of the Kristine ID Wallet, one showing how to make the alternate version of the ID window pocket, one showing how to make the original ID window pocket, and the most recent addition, a video showing how to put the Kristine ID Wallet together. Coming soon, the final video in the Kristine ID Wallet video tutorial series showing how to make the wrist strap and lanyard strap.

0D9DFDD6-D04A-41AE-A1E2-F210DE1ED49D.jpeg

Make sure you subscribe to the Uniquely Michelle YouTube channel so you know when new videos are posted on the Uniquely Michelle channel. You can also sign up below to receive the Uniquely Michelle newsletter - a great way to keep up with the latest happenings at Uniquely Michelle. If you don’t yet have the Kristine ID Wallet pattern, you can purchase it at the Uniquely Michelle Etsy Shop, the Uniquely Michelle Website Shop, or on Bluprint.


A New Kristine ID Wallet Video Tutorial

Michelle Burke

I have exciting news! I have posted another video tutorial on the Uniquely Michelle YouTube channel! In this latest video, I make the original ID pocket window - the version that is in the Kristine ID Wallet pattern.

The original ID window pocket for the Kristine ID Wallet

The original ID window pocket for the Kristine ID Wallet

There are now three video tutorials available on the Uniquely Michelle YouTube channel, all of them for the Kristine ID Wallet. The three videos include one for making the flap side of the Kristine ID Wallet, one showing how to make the alternate version of the ID window pocket, and now this recent video showing how to make the original ID window pocket. I plan to finish the Kristine ID Wallet video series with a tutorial showing how to put it all together and another showing how to make the wrist strap and lanyard. I will have these last two videos out in the next month or so.

Make sure you subscribe to the Uniquely Michelle YouTube channel so you know when I post new videos. You can also sign up below to receive the Uniquely Michelle newsletter - a great way to keep up with the latest happenings at Uniquely Michelle. If you don’t yet have the Kristine ID Wallet pattern, you can purchase it at the Uniquely Michelle Etsy Shop, the Uniquely Michelle Website Shop, or on Bluprint.


Back At It!

Michelle Burke

Hello! It’s been a while!

You may not have noticed, but I took some time away from Uniquely Michelle. Life got crazy and I decided to step away from Uniquely Michelle for a few weeks back in August. Well, a few weeks turned into a few months and here we are now at the beginning of 2020. Read on if you want the details of what life has held for me over the last 5 months!

My 2-week break started because I wanted to spend time with my daughters - this summer was the last time my husband and I and our two daughters would all be living under one roof together. Our oldest daughter, Megan, graduated from Kansas State University with a master’s degree in architecture in May. She started her job at an architecture firm in June and lived at home until she could find an apartment of her own. Sarah, our youngest spent the summer break from Colorado State University at home.

Megan with her very large, 8-month-old goldendoodle puppy, Lucy. I also spent some time puppy-sitting this very loveable pup the last few months.

Megan with her very large, 8-month-old goldendoodle puppy, Lucy. I also spent some time puppy-sitting this very loveable pup the last few months.

August 17th was moving day with Megan, moving into her own apartment about 45 minutes to the south and Sarah, moving back up to school a couple of hours to the north. Needless to say, we spent all day loading the truck, driving, and unloading the truck repeatedly. After all that I decided I needed one more week to get back to “normal” life - little did I know normal wasn’t returning anytime soon!

Sarah and her fiance Brad.

Sarah and her fiance Brad.

A week later, Sarah and her boyfriend got engaged! Sarah and Brad won’t be getting married until after she graduates in the spring of 2021, so a long engagement with plenty of time to plan - thank goodness!

Around the same time we were rocked with another surprise of a different kind - rumors of impending layoffs at the company my husband, Brian works for. It was a lot to take in all at once, so my break from Uniquely Michelle continued. In the following weeks, Brian and I relaxed a bit about the layoffs as the company historically didn’t lay off employees who had worked for the company for many years and especially those who were known as hard workers and much-loved bosses. Well, we were wrong - after an almost 28-year career at the same company, Brian got laid off. This happened a month after moving our daughters out of the house. Brian and I both needed time to get used to this news and to figure out what our next season of life looked like, so more time away from Uniquely Michelle for me.

IMG_5669.jpg

That brings us to today, 3 1/2 months after Brian was laid off. Brian and I are still figuring out what’s next, but I am more than ready to get back to Uniquely Michelle! I am even more excited about moving forward with my work given that I have a partner who is excited to help me! You will be seeing more of my new business partner, Brian at least over the next couple of months and maybe longer - who knows!

I have missed interacting with all of you. I have at least seen some of your Uniquely Michelle creations over the last several months and I am excited to share some of these beautiful creations over the next few weeks! I appreciate those who have stepped up to answer questions posted in the Uniquely Michelle Facebook Group! I also appreciate everyone’s understanding as I stepped away for a bit! Sometimes we are thrown curveballs in life, but I like to think of them as the next great adventure that God has planned for us! I feel refreshed and ready to sew, create, design, and get back into the conversation! Stay up to date as Uniquely Michelle gets back at it on Instagram, the Uniquely Michelle Facebook Page, and in the Uniquely Michelle Facebook Group. Sign up below to receive the Uniquely Michelle newsletter - yet another way to stay updated on Uniquely Michelle.


New Video Tutorial for the Kristine ID Wallet

Michelle Burke

The first Uniquely Michelle video tutorial, “Kristine ID Wallet - Envelope Flap Side” showing the making of the flap side of the Kristine ID Wallet, went over well, so I decided it was time to make another video tutorial. This time I made the ID window side of the Kristine ID Wallet using the alternative method for making the ID window pocket.

IMG_4465.jpeg

This alternate version for making the ID window pocket has become quite popular and it is really a fun way to make the ID window pocket. Check out the “Kristine ID Wallet - Alternate ID Window Pocket Side” video on the Uniquely Michelle YouTube channel! While you are there, make sure to subscribe to the Uniquely Michelle YouTube channel, then you can be the first to know when I publish more video tutorials.

Screen Shot 2019-04-11 at 2.59.01 PM.png

If you would rather read the instructions for making the alternate ID window pocket, that is available in the “An Alternative ID Window for the Kristine ID Wallet” blog post. The blog post includes the measurements, instructions, and photographs showing each step.

A Customer Appreciation Sale

Michelle Burke

I appreciate my customers so much! Without you, there would not be a Uniquely Michelle. To show my appreciation, all Uniquely Michelle patterns are on sale for 15% off starting today, February 12 through Valentines Day, Thursday, February 14.

Screen Shot 2019-02-05 at 1.41.02 PM.png

You do not need a coupon code to purchase a pattern from Etsy or Bluprint. Use coupon code “15LOVE” when purchasing from the Uniquely Michelle Website Shop.

Here are all the links you need:

UM Etsy Shop: http://bit.ly/UMOnEtsy

UM Bluprint Shop: http://bit.ly/UMonBluprint

UM Website Shop: http://bit.ly/UMWebsiteShop

Thank you Uniquely Michelle Customers! You fuel my creativity and you are helping to make this a fun adventure!

A New Year at Uniquely Michelle

Michelle Burke

With January well underway, I thought I would give you a quick recap of 2018 and a preview of my plans for Uniquely Michelle for 2019.

Looking back at 2018, it could be called the Year of Tutorials for Uniquely Michelle. There were several tutorials for the Kristine ID Wallet including the Alternate ID Window tutorial, the Gift Box tutorial, and the Flap Side Video Tutorial. It was so fun making the first video tutorial - I can’t wait to make a video for the ID window side of the Kristine ID Wallet!

This is the Kristine ID Wallet that Cheryl Brewer Gloege made for swap partner, Brenda Ellendson. Cheryl also made a Kristine ID Wallet gift box for the KIDW and included a matching Snap To It Key Fob and some candy!

This is the Kristine ID Wallet that Cheryl Brewer Gloege made for swap partner, Brenda Ellendson. Cheryl also made a Kristine ID Wallet gift box for the KIDW and included a matching Snap To It Key Fob and some candy!

Another first for Uniquely Michelle in 2018 - hosting a swap! The Kristine ID Wallet Swap was fun.

Adding a Crossbody Strap to the Lindsay Wristlet was another tutorial that was published on the Uniquely Michelle Blog in 2018. This is my favorite way to add a crossbody strap to the Lindsay Wristlet and it makes the Lindsay Wristlet perfect for travel. I used it to hold my passport and all my essentials as I traveled Europe last spring.

The Snap Blog Series was a success! I think everyone learned a lot about installing both plastic, Kam Snaps and metal, SnapSource snaps during this blog series.

The Snap Blog Series culminated with the release of the free Snap To It Key Fob pattern.

December was a busy month personally, as I made several Christmas gifts for relatives this year, including eight Set To Go Cosmetic Bag sets. They were a labor of love and they were well received. I gave them to my mom, sister, my five sister-in-laws, and one of my nieces.

I didn’t want to leave my dad out of the handmade gifts, so I made him a leather Retreat Bag (pattern by Emmaline Bags).

Screen Shot 2019-01-22 at 12.27.00 PM.png

December was a bit crazy with the Craftsy/Bluprint changes. In case you haven’t heard, Craftsy is becoming Bluprint. I felt it was very unfortunate how Craftsy handled communication with designers as they closed down several pattern shops and removed several patterns from the shops that remained open on Bluprint. I feel extremely fortunate to still have a shop on Bluprint that includes three patterns - the Kristine ID Wallet, the Lindsay Wristlet, and the Just the Ticket Luggage Tag. These three patterns along with all the other Uniquely Michelle patterns are available in the Uniquely Michelle Etsy Shop and the Uniquely Michelle Website Shop. The only exception to this is the free, Snap To It Key Fob pattern - it is only available in the Uniquely Michelle Website Shop as Etsy does not allow the posting of free patterns. I will keep you updated on the ongoing changes as Craftsy continues to switch over to Bluprint. I am hoping to be able to add the rest of my patterns to Bluprint at some point in 2019. Also, you can still access any Uniquely Michelle patterns that you purchased on Craftsy on Bluprint - just sign in and click on “Library,” then click on “Own Forever Library,” and finally click on “Pattern Library.”

I’m loving planning using The Maker’s Yearbook 2019! It’s a great planner for anyone with a handmade business.

I’m loving planning using The Maker’s Yearbook 2019! It’s a great planner for anyone with a handmade business.

Looking ahead to a new year is always exciting for me as I plan what is next for Uniquely Michelle. In 2019, I plan to make more video tutorials available on YouTube - they are fun to make and a great resource for you. I am planning on writing a blog series or two. I’m also thinking another swap (maybe with the Just the Ticket Luggage Tag?) would be fun. I have more thoughts and ideas that I need to finalize before I share them, but I think 2019 will be an exciting year for Uniquely Michelle! Let me know if you have anything you would like have happen with Uniquely Michelle in 2019 in the comments below. Also make sure to sign up for the Uniquely Michelle newsletter so you don’t miss out on any upcoming happenings!

A Sewing Bucket List

Michelle Burke

Today I am going to share with you a sewing adventure that I undertook that has nothing to do with a bag, but it did get something off my bucket list! Yes, I have a bucket list, but my bucket list looks very different than most bucket lists I hear about. Most people’s bucket lists have items on them like, ride in a hot air balloon; visit all the continents; have lunch with someone famous; swim with a dolphin in the wild; be an extra in a film. My bucket list, on the other hand, is a sewing bucket list! 

Screen Shot 2018-10-03 at 1.29.47 PM.png

I love to sew and I am pretty good at it, but I am always wanting to learn new things and improve so I have a sewing bucket list to help me do this. My sewing bucket list is ever changing and growing. I may never check everything off my list, but I love it when I can check something off and recently I was able to do that.

IMG_0397.jpg

A few years ago I decided I wanted the challenge of making myself a wool coat. I have made clothing (for myself and my daughters mostly), I have made window coverings, I have made quilts and I have made bags of course. But sewing a wool coat for myself was a challenge, especially since I wanted it lined and I wanted it to have a hood with faux fur trim.

I am excited to say that my wool coat is complete and I love it! I bought the wool, the silk lining and the faux fur from Mood Fabrics and I used the Pepernoot Hooded Coat pattern by Waffle Patterns. The pattern was easy to follow and I was really happy with how easy it was to sew with the wool. The silk was a little more difficult as it shifted quite a bit as I was cutting and sewing with it, but I like the way it turned out so it was worth a few frustrating moments.

I followed the pattern almost exactly. One change that I made was to line pocket pieces with the silk so that there were not any raw edges on the inside of the pocket once it was sewn in place. I also wanted a slightly more fitted look, so I took the coat in at the waist by about a half inch.

IMG_0405.jpg

This coat took some time to make, but it was worth going slow and getting it right. I had fun challenging myself by making this coat! 

Are you wondering what else is on my sewing bucket list? Here is what is on the list at the moment:

  • Make myself a pair of jeans

  • Make 80% or more of my wardrobe for a season

  • Make a quilt with curves (I love the Sew Kind of Wonderful quilt patterns, especially Urban Candy, Lattice Revival and Chic Country!)

  • Make a few mini quilts

  • Give only handcrafted gifts for Christmas one year (this can include food items, crocheted items - all the gifts just have to be handmade)

  • Dress shirt for Brian

  • Make a new or redesign an old wedding dress

  • Design a sewing pattern for a piece of clothing for myself

  • Add some embellishment (see @wildboho on Instagram) to a piece of clothing

Can you guess which item on my list scares me the most?

What is on your sewing bucket list? Please share by commenting below!

Uniquely Michelle's First Video Tutorial

Michelle Burke

A lot of people focus on the ID window pocket side of the Kristine ID Wallet. There are a couple video tutorials out there for making the ID window pocket and a couple of alternative methods form making the ID window pocket. With the ID window pocket getting all the attention, the envelope flap side gets overlooked.

IMG_3381.jpeg

I decided it was time for the envelope flap side of the Kristine ID Wallet to get its time in the spotlight, so it is the star of the first Uniquely Michelle video tutorial. In this tutorial, I go through each step in making the envelope flap side of the Kristine ID Wallet, including making the card pockets, the flap and the key ring loop. I also share tips and tricks as I go.

IMG_3391.jpeg

Although I talk about installing a magnetic snap in the video tutorial, I go through the steps of installing a SnapSource metal snap. There are a couple steps that need to be altered when adding a metal snap, so I make sure to highlight the changes as I am sewing and adding the snap.

Check out the new Uniquely Michelle YouTube Channel and The Kristine ID Wallet Tutorial - The Envelope Flap Side video tutorial. I hope you learn from and enjoy this first Uniquely Michelle video tutorial. I learned a lot as I made it and I am excited to make more video tutorials!

Stay up to date on the latest happenings at Uniquely Michelle by signing up for the Uniquely Michelle newsletter below!

The Snap To It Key Fob & The Lindsay Wristlet

Michelle Burke

I’ve already talked about what a great pair the Kristine ID Wallet and the Snap To It Key Fob make in a previous blog post. Today I want to talk about the Snap To It Key Fob and the Lindsay Wristlet as a set. The Snap To It Key Fob is an obvious choice to use as a replacement for the wrist strap on the Lindsay Wristlet. The Snap To It Key Fob adds some character to the Lindsay Wristlet and it is an easy way to keep your keys together with your essentials!

IMG_3276.jpeg

You can make the Lindsay Wristlet as you normally would with a D-ring and then just add the Snap To It Key Fob to the D-right. This is what I did to add a Snap To It Key Fob to a Lindsay Wristlet. Another option would be to replace the D-ring with a 1/2” swivel snap hook. This would make it even easier to add the Snap To It Key Fob quickly and easily.

IMG_3279.jpeg

I made this Lindsay Wristlet using a fabric I love - Bookplate by Alison Glass in charcoal for the exterior. For the pockets on the interior, I used Dimples by Gail Kessler in dark orchid. I used these same fabrics for the Snap To It Key Fob. It is fun to see the pocket fabric on the Snap To It Key Fob since the only way you see this fabric on the Lindsay Wristlet is by opening it up.

What an easy way to attach my wallet to my work bag (Sidekick Tote)!

What an easy way to attach my wallet to my work bag (Sidekick Tote)!

I love the idea of being able to hang my Lindsay Wristlet on a shopping cart, a stroller, or on a bag handle if I want. I also love how the Snap To It Key Fob adds some pizzaz to the Lindsay Wristlet.

IMG_3278.jpeg

You can purchase the Lindsay Wristlet pattern from the Uniquely Michelle Craftsy Pattern Shop, the Uniquely Michelle Website Shop, or the Uniquely Michelle Etsy Shop. The Snap To It Key Fob pattern is a free pattern that can be found in the Uniquely Michelle Craftsy Pattern Shop or in the Uniquely Michelle Website Shop.

Make sure to keep up with all the latest happenings at Uniquely Michelle by signing up for our email newsletter below!